It’s finals time and the weather is heating up (and it’s about time), be on the lookout for those blisters creeping up!.
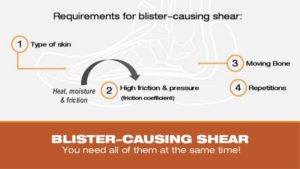
This diagram below, is fantastic for describing all the components of our body and footwear that contribute to the development of blisters.
Ok, let’s start by talking about the prevention of blisters – because as the cliche goes – prevention is better than cure.
Technical Socks
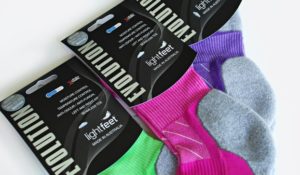
A good example of these are the Lightfeet Evolution socks which have been designed by Podiatrists for optimum fit and protection using anatomical fit and increased forefoot and heel cushioning. These socks are a combination of ‘coolmax’ and ‘x-static’ materials for moisture and temperature management, anti-odour and antimicrobial properties. Plus so much more – be sure to check them out. They are stocked at The Athlete’s Foot.
Fleecy Web
This is an anti-friction based material that aims to provide a friction barrier. This product can be applied to to either your skin or the shoe, whichever works best. This product is available at Border Podiatry Centre.
Blister-proof Adhesive Pads
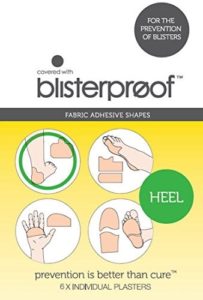
This product acts like a second skin, preventing friction/rubbing, which in turns prevents blisters. You can buy particular pads depending on where your blisters are occurring! You can look into these further and purchase directly from their website at Right Here .
Now – let’s get down to the nitty gritty of blisters. It is important to know what type of blister you have so you can manage it properly. There are 3 types of blisters;
- roof intact
- roof torn
- de-roofed
1. Blister Roof Intact
- avoid popping your blister
- dress your blister. Use an island dressing with an absorbent pad surrounded by adhesive (an example is a primapore or cutiplast dressing which can be purchased from a chemist)
- The Band-aid ‘tough strips’ are also good if they correctly cover the site and might be handy to keep in your sports bag in case a blister appears.

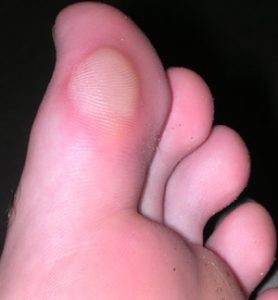
2. Blister Roof torn
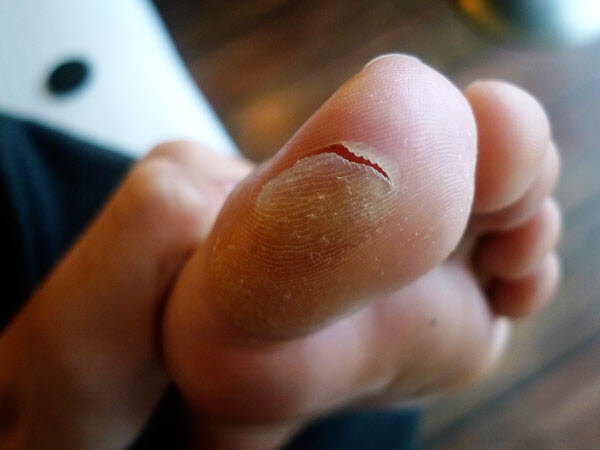
- DO NOT tear the roof of your blister right off – lay it back in place over the top of the open blister (see image below)
- Apply an antiseptic, such as Betadine liquid
- Dress your blister with an island dressing with an absorbent pad surrounded by adhesive (eg Primapore, Cutiplast sterile or Band-aid tough strips)
- As well as keeping the blister dressed, it is also important to reduce pressure and friction at the area as well as monitoring for any changes
- With this type of blister it is particularly important to monitor for any signs of infection (redness, heat, swelling, pus)
3. Blister De-roofed
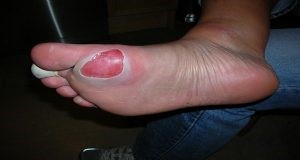
- Apply antiseptic to the site. Betadine liquid is a great option as it wont make the underlying skin soggy.
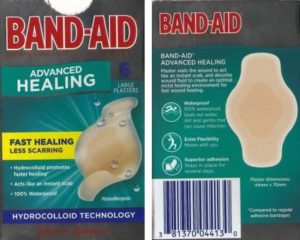
- Dress the blister with a hydrocolloid dressing if possible as this will speed up healing. An example of this type of dressing the Band-Aid advanced healing dressings.
- As well as keeping the blister dressed, it is also important to reduce pressure and friction at the area as well as monitoring for any changes
- With this type of blister it is particularly important to monitor well for signs of infection (redness, heat, swelling, pus)
AVOID STICKING ANYTHING ADHESIVE DIRECTLY ON THE BLISTER ROOF OF ANY TYPE OF BLISTER AS IT MIGHT TEAR WHEN YOU REMOVE THE DRESSING AND THIS DISRUPTS HEALING! (NOTE THE SHOUTY CAPITALS)
If you are finding all our tips helpful but those blisters are still creeping up, be sure to stay tuned in with us for a further video and additional tips for trying to stop blisters in their tracks.